Friday, January 31, 2025

Hot dry Salami

 Hot dry Salami


This is a recipe for a basic dry Salami that I came up with that is currently in the dry stage, hopefully ready and delicious in few months.

    Previous attempts failed and the reason was the detachment of the meat from casing, during the dry stage, causing oxidation that completely ruined the salami. I used a dry fibrous casing for those attempts and I believe that it has contributed to the issue. The other factors were probably the smearing of fat during grinding and mixing, as well as not mixing the meat long enough to develop that sticky consistency that is important to make it stick to the casing.

    This time around and after watching several videos online, I have made few changes to the process that I believe will fix the issues, as follows:

  • Freezing the grinding tool, in my case, the aluminum head of a electric meat grinder. This helps to maintain the meat cold, specially fat, during grinding.
  • Using lean beef and pork as the meat source and a separated 100% pork fat from pork belly. This way I could measure exactly the fat content to 40%
  • With meat and fat on separate bowls, ground it semi-frozen separately, making sure to avoid smearing of fat.
  • Once ground, mixed just the meat in food mixer for couple of minutes (about 10min), until sticky, including all the spices and culture.
  • Mixed the ground fat with the sticky meat, gently, to try and keep the fat chunks intact.
  • This time around, using 3 different types of casing to see if any, specifically, is more prone to create the detaching issue. Used natural hog casing, natural dry casing (looks more like a collagen casing) and fibrous casing.
As I type this, this batch is dry curing for about 2 weeks now. Hot stage was very quick, with PH drop from 5.6 to about 4.76 in 24h. I believe that I misread the culture temperature range and had the hot chamber at 90F, when optimal range for the culture was 64 to 75F. I guess that the culture liked the warmer temperature and did its job very quickly. Hopefully, no off flavors from fermenting this hot.

So here is the recipe, and yes, will be using metric system:

  • 454g lean pork loin
  • 454g lean beef
  • 605g pure pork belly fat
  • 42g sea salt (2.8%,no iodine)
  • 3.8g cure #2 (0.25%)
  • 0.95g Sodium Erythorbate (0.063%)
  • 3.03g malto-dextroser (0.2%)
  • 3.03g coarse ground black pepper (0.2%)
  • 3.03g whole black pepper corns(0.2%)
  • 3.03g sugar (0.2%)
  • 3.03g garlic powder (0.2%)
  • 6.05g red pepper flakes(0.4%)
  • 1.66g SPX culture, dissolved in 1/4 cup of water, at room temperature
  • 90ml red wine
Salamis were set in a mini fridge chamber at 45F and 80% humidity. A separate post will talk about this chamber.

Initial tracking shown below. Average weight loss of 18% in 10 days.

Start Date1/11/25Salami #PH
Target weight loss %40FibrousNaturalDry natural
Start4123895454.76
Target247.2233.4327<5.1
Date    
1/22/25346312455 

TO BE CONTINUED WTH UPDATES


Wednesday, January 29, 2025

Dry curing equipment setup

 Dry curing equipment setup


Humidity control, in my experience, is very critical to determine whether your salami process will fail or succeed. It is also a difficult thing to achieve with the tools available to the hobbyist  attempting to build their own curing chamber. 

Commercial curing equipment are available, some small enough to fit on you kitchen counter, that supposed to give you full control of both temperature and humidity. These, however, can cause a dent on your bank account, going from few hundred to thousands of dollars.

Being on the DIY side, I have been trying to build my own setup using mini fridges and so far, I have had limited success. I just finished building a new setup and will report back in a couple of weeks. The different thing about this last design is about the humidity control, more on this later.

For those starting to consider dry curing, I would recommend to get your setup built first, fine tune it to ensure that it delivers what you are aiming for in terms of temperature, humidity and air flow. The last thing you want is to have lots of meat ready to cure, to then realize that your system is not able to maintain the parameters that you need. 

The following are the basic capabilities that I would consider for any setup:

  • Hot stage: maintain temperatures in the range of 80F to 100F, for fermentation stages of curing, like in dry salami. Humidity control in this setup is not totally required, since you can maintain higher humidity by just wrapping the meat in clear film during fermentation (close to 100% RH). Also, precise control of temperature is not a big deal since most curing cultures will work just fine in a wide range of temperatures.
  • Cold stage: maintain temperatures and humidity for the longer dry curing period, which can last several weeks to months. In this period, desired temperatures can be in the high 30's to low 50's and humidity in the range of 75% to 85% RH. This is when the trouble strikes, maintain both temperature and humidity in check, when these two variables are inter-dependent. Most controllers are either for temperature or humidity, less common to find a device that can control both simultaneously and even then, it just ignores the fact that controlling temperature affects the relative humidity, and the other way around.
  • Air flow, internally and intermittent external air exchanges. This is not a major challenge since small fans can be used for internal flow and by just opening the chamber door every other day, one can provide the external fresh air needed.
Let's address each of these stages and my experience in trying to achieve it, "trying", because to date I have not been able to get results to my liking. I hope that these attempts and failures help other enthusiasts to avoid wasting time and money with methods and equipment that will not deliver what you need.


The hot side


The purpose of this step is to create the ideal environment for fermentation, where the curing cultures (good bacteria) will convert dextrose into lactic acid, dropping the PH and stopping bad bacteria from developing. The recommended target PH during fermentation is <5.3, before you can move the meat into the cold stage curing.

For the most part, dry salami and other fermented sausages make use of a fermentation step, although whole muscle curing can also make use of curing cultures. There are different ways that you can achieve this step, some as simple as hanging your meat in room temperature, in your oven with the lights on, or a simple chamber with a cheap temperature controller.
The idea is to provide the curing culture with the temperature range that it supposed to work best, for instance, some examples of common cultures and range shown below:
  • Bactoferm T-SPX: 64-75F (dry salami)
  • Bactoferm FRM-52: 72-90F (medium-diameter salamis and other dry, fermented sausages)
  • Bactoferm HPS: above 90F (whole muscle)
Although it may sound interesting to have both hot and cold side in one chamber, for instance a mini fridge with a heating element inside, you may realize that it makes more sense to have two separated chambers, so you can have meats in different stages of curing, simultaneously.

I strongly suggest to start simple with a batch of salami, using either T-SPX or FRM-72 cultures, so you can ferment the meat at room temperature and focus on the cold side setup. If preferred fermenting in a slight warmer temperature, you can use the kitchen oven with the lights on. The process of fermentation usually lasts for a day or two.

If you decide to cure using other strains that require warmer temperatures for fermentation, like Bactoferm HPS (>90F), building a hot chamber can still be a simple project, here are few suggestions:
    1. Think about how big the chamber needs to be, so you can fit the meats that you are curing, or plan to cure in the future, with plenty of space to add some additional equipment inside, like a humidifier and or dehumidifier.
    2. Any closed space can be turned in a curing chamber, ideally an insulated box, like a cooler or something that you can build cheap. Even a large cardboard box can be used. Building an insulated box is also not complicated, for example, cutting and hot-gluing 1in XPS (extruded polystyrene) boards together from Home Depot, Lowes, etc.
    3. Get a temperature controller or an all-in-one mini electric heater, something cheap and easy to use. This selection depends on how comfortable you are with connecting wires and doing electric work. There are many options online, a few listed below:
    • All in one systems: These plug directly into an regular wall outlet and although I have not used these, seems like a straight forward and cheap way ($26 i Amazon)
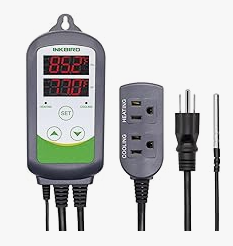
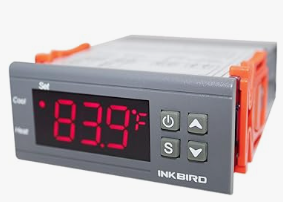
    • Plug and Play temperature controllers: The variety of devices available is immense, and can also be a cheap option. For the most part, these also plug in a regular power outlet and switch on-and-off a power output for an external heater, or cooler device. The external heating device can be as simple as a regular light bulb, an infra-red bulb, or a heating element powered with 120vAC. Unless you plan to have the hot chamber in a location with ambient temperatures above the range that you need, cooling is usually not required. Adding a cooling device to a chamber can be tricky and for the most part, a minifridge is turned into the chamber, a more expense project. Below are few examples of these types of controllers and option for the heating elements, all found at Amazon or other online stores.
                            $18

                            $35
                            

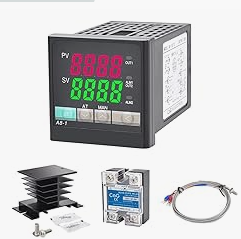
    • Panel mounted controllers: These require some wiring, so may not be for every hobbyist. 
                        $20
                        

                    $25
                    

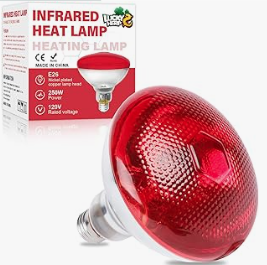
    • Heating elements
                    $10, bulb socket.
                    

                       $14
                        

                    $12, heating mat for reptile enclosures


                    To be continued....